In this assignment, you will experiment with generating images using the iterated image functions. Throughout the assignment, you will:
- Practice writing functions with names (e.g. named functions) and without names (e.g. anonymous functions)
- Practice the process of abstraction by relying on your work from Exercise 1
- Practice translating mathematical expressions into code
What is abstraction?
One of the core principles in computer science is abstraction–masking the "details" of how something works and instead just assuming that it works the way someone says it does. We've actually done quite a bit of this already; now we're just giving it a name. For example, we don't know exactly howcircle produces a circle. We just know that if we give it the inputs it asks for, that it does something that makes a circle of that type appear. Why is abstraction important?
Well here's a farfetched example...
Imagine you're in charge of a company that designs air planes. How do you think your boss would react if you designed a plane that could fly from O'Hare to JFK in New York one single time before having to be replaced? Your passengers get on the plane, fly to New York, and then that plane is toast–a completely one-off machine.
Now surely you see a problem here. No one is going to want to buy your plane if it can only be used once.
So you decide to redesign it so it's re-usuable...but now it's only usable between O'Hare and JFK. It can't fly to any other airports...
Still no one wants to buy your plane. Is the market rigged? Or is the product you've designed too limited? You go back and redo your design so that the plane is capable of lots reuse and it can be flown to any destination less than 2000 miles away.
Now your planes are flying off the shelves. This example, though ridiculous, is a demonstration of the process of abstraction. Your first design worked, but only a single time. Then you refined it so that it could be re-used. Then you refined it even further so that it could be re-used across a variety of contexts.
When we write programs we are (usually) not trying to design software that can only be used once for one specific thing. Instead we are aiming to build powerful and flexible computational machines that can handle a variety of inputs. That way, we can start to think with our machine in mind (i.e. we know how this part of the task can be solved because our program can solve it) and move on to other and/or larger tasks.
This assignment will give you practice with the process of abstracting programs. You’ll begin by writing very basic code, then gradually building up layers of abstraction to mask complexity, minimize repetition, and write reusable and generalizable patterns.
Starter Code Details
We’ve provided some starter code for you in the
exercise_2.rkt file. For all questions in this assignment, the starter code has examples of the image you’re trying to produce. We’ve also provided a library file called iterated-images.rkt. This file holds definitions of several functions you’ll need to use during this assignment. You don’t have to look at the code in this file, but you do need to make sure that both files (exercise_2.rkt and iterated-images.rkt) are in the same folder on your computer. Click here if you're on Windows
These files are provided in the ZIP file. You have to extract that zip file before editing. On a Mac double click on the ZIP file to expand. On Windows and ChromeOS, for some reason they allow you to open these files in what's called READ-ONLY mode (in the bottom right hand corner of DrRacket will be a yellow box that says READ ONLY). Don't do that! Instead, first extract all the files into yourcs111 folder and THEN start working. Error loading iterated-images.rkt
First, check to see thatiterated-images.rkt and your exercise_2.rkt file are in the same folder on your computer. Second, make sure that the file you have open is actually the one you intended to open (close DrRacket then re-open your tutorial file.) Third, if you're on a Mac, you may have gotten a popup asking for permission to access a folder on your computer. If you said no...then DrRacket can't read your file. You can fix it by going to System Settings (or System Preferences), selecting the Privacy & Security tab, looking for the FILES AND FOLDERS option, and checking all of the options under DrRacket. Note: Like the last assignment, we’ve tried hard to provide instructions for those who have a difficult time seeing colors. Please let us know if any of the questions cause you issues.
Getting Started
Start by opening the exercise_2.rkt file. At the top of the definitions file you’ll see two require statements. Each asks DrRacket to import or load some external libraries (just like checking out a book from a real library):
(require 2htdp/image)
(require "./iterated-images.rkt")
The second line should look familiar, it loads the image library from our auxillary textbook “How to Design Programs (2E).” The second line asks DrRacket to load in the library we provided in your homework download. The ./ says “please look in the same folder as the file we’re currently editing” while the second part is the name of the file to load. We’ve written the require commands for you for this assignment but you will need to understand how they’re importing code for future assignments.
Unit Tests (Testing your Code)
The starter code contains a series of unit tests: pieces of the program that test your code against sets of expected results. When you run your code by clicking the “Run” button or Ctrl + R (Cmd + R on Mac), DrRacket will run the tests and generate a report of what tests succeeded and failed. If any tests failed, they’ll show in the Interactions Window. To troubleshoot your output, you’ll need to compare your image results to the expected results. When you run this file for the first time, you'll see all your tests failed. Don’t panic. You haven’t programmed anything yet! If you look through the test window, you'll see that a number of different named tests failed.Breaking a Problem into sub-goals
Tip: It's almost NEVER a good idea to tackle "all" of something at once when it comes to programming. Instead, make small sub-goals for yourself and attack each sub-goal first. For example, remember in Exercise 1 when we made a circle overlaid on another circle? Sure, you could tackle that all at once. But you could also create small sub-goals like 1. create a small red circle; 2. create a large blue circle; 3. overlay red circle on top of blue circle. That way, if you run into an issue in any one particular sub goal, you know it's due to something in that specific section of your program.
Workflow - Option 1
You can work directly in the Definitions Window. Whenever you want to test what you’ve written, just run the file, which will generate a testing report in a popup window. Tip: If you want to work on one part of the homework at a time, select any tests you don’t want to run, and click Racket > Comment Out With semicolons (
;). Racket ignores anything that comes after a semicolon when it runs your program, so you won’t get notified if those tests fail. When you’re ready to tackle those parts of the assignment, highlight the commented-out region and click Racket > Uncomment to restore the code. Don’t forget to uncomment and run all your tests before you submit. Option 2
Alternatively, you can work in the the Read/Evaluate/Print Loop (from now on, we'll call it the **REPL**), aka the Interactions Window. The REPL is nice for fiddling with your code without having to continually re-run the file, and you can hit `escape + p` on your keyboard to repeat your previous command if you want to make adjustments. Keep doing this until you get the result you’re looking for. Once you’re satisfied with your results, paste your code into the Definitions Window in the appropriate place. If there’s an error in your code in the Definitions Window then nothing from the Definitions Window will work in the Interactions Window until you fix the error and hit the Run button again. For example all of the `iterated-*` functions from our `iterated-images` library won’t be there! So it’s usually best to write one function at a time and test each one as your write it rather than writing all of it at once and then start trying to fix it.
Part 1: Iterative Expressions
In this section, we’ll use three iterator functions: iterated-overlay, iterated-beside, iterated-below, and iterated-above. We covered these functions in class so checkout the lecture slides and recordings for details.
For this part of the homework, we’ve provided placeholders or stubs for your code. Just look for the line that says something like:
(define question-1 "fill this in")
and replace the string “fill this in” with your answer. This will allow the tests to find your code.
Question 1: A Simple Bullseye
Part A
Use overlay to generate a "purple" bullseye consisting of five concentric circles. The smallest circle should have a radius of 10 (earlier this was a typo), and the largest should have a radius of 50. The circles should be an even distance apart.
Part B
Now use iterated-overlay to generate an image identical to your result from Part (a). Remember that iterators begin counting at 0, not 1, which means you may need to adjust your math slightly to avoid creating a circle with zero radius. If you’re getting something like the figure below (though in a different color), that’s probably what’s happening to you:

Question 2: Hexagonal Snowman
Use iterated-above to generate a snowman made out of 4 "purple" hexagons. The side-lengths of the hexagons should should range from 10 to 40.
Question 3: A Simple Flower
Use iterated-overlay to generate a flower. The rotate function might be helpful. You will need to use five ellipses defined as follows:
(ellipse 100 50 "solid" "olivedrab")
Question 4: A Colorful flower
Use iterated-overlay to generate a colorful flower. This flower should be identical to the previous one, except the ellipses should be colored accordingly:
- The first ellipse produced by
iterated-overlayshould be perfectly green, i.e.(color 0 255 0). - Each successive ellipse should be 25 units more blue and 25 units less green than the previous ellipse.
Need help with colors?
## RGB(A) Colors Like we explored last week, colors can also be represented in a format calledRGB. The exact details of [how RGB works](https://en.wikipedia.org/wiki/RGB_color_model) are beyond the scope of this course, but you can think of a color as a list of three values between 0 and 255, each member of which corresponds to the amount of red, green, and blue light it contains.Some Examples!
- "blue" is (0 0 255). Notice that this color has zero red light, zero green light, and full blue light.
- "black" is (0 0 0). This color has zero red, green, and blue light.
- "white" is (255 255 255). This color has the maximum amount of light of red, green, and blue light.
;; color: number number number -> color
(color red-light  green-light  blue-light)
where each of `red-light`, etc. is a number between 0 and 255. So we can replace `"blue"` with `(color 0 0 255)` as demonstrated by the following REPL session:
 Returning to the flower you wrote in the previous question, change the color `"blue"` in the ellipse definition to `(color 0 0 255)`. The test should still pass. Since we can represent colors numerically, we can also use simple math to _change_ colors. For example, increasing a color’s red-light value by 150 will make it 150 units more red:
 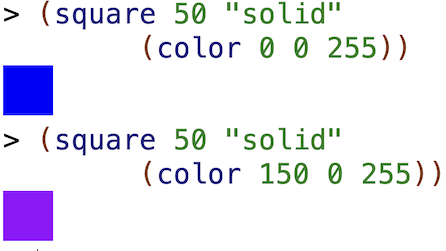 We can also control the opacity of a color by adding a fourth number, known as the alpha value. The alpha value is a number between 0 (completely transparent) and 255 (completely opaque). Once you add an alpha value to an RGB color, you’re using the RGBA format (the A stands for "alpha").
 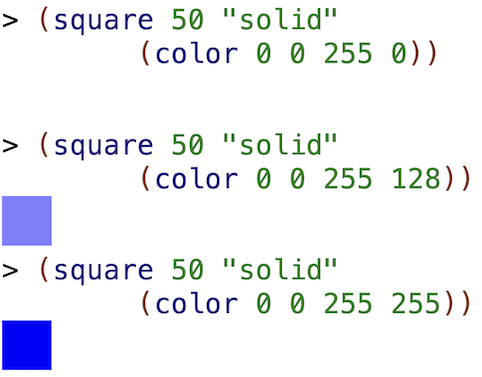 Note that the Racket
 Hint
You must useiterated-overlay for this question. You can start by copying your solution from Question 3, then modifying the part of the code responsible for the color of the ellipse on each iteration. Question 5: A Fancy Flower
Use iterated-overlay and interpolate-colors to generate a fancy flower. This flower should be similar to the previous one, except that each ellipse should have an alpha value of 128, meaning that the colors of the different ellipses will blend with the colors below them. Remember that alpha is the fourth argument to the color function!
You must use interpolate-colors in your implementation, starting with red and ending with blue. Remember that iteration starts at 0, so if you call an iterator n times, the final iteration will be n-1. You may need to adjust your math to make sure the fifth iteration is completely blue.
Need help with interpolate-colors?
See Tutorial 2 for more details on this function. Start by writing your answer to use an alpha value of 255 and see if you can make it look like “midway” test image provided. Once it does, then change it to use an alpha value of 128 and it should look like the real image.
Part 2: Function Abstractions
Now that you’re familiar with the abstractions provided by the iterated library, we can start abstracting even more. In this section, you will write reusable functions to generate images from some template, but with even more flexibility.
Whenever you write a function, you should start by writing two comments: a signature and a purpose statement.
- The signature defines the name of the function, then a colon (
:), its input arguments in order, an arrow (->), and then the type of return value (or output). It should almost read as an icebreaker statement for the function: “Hello, my name is doubler and I expect one number and then give you back a number.” - The purpose statement is a brief human-readable description of what the function does.
Here’s what that looks like in practice:
;; doubler : number -> number
;; Takes a number and multiplies it by two
(define doubler
  (lambda (n)
    (* 2 n)))
Remember, any line that begins with a semi-colon is a comment which means it’s just a note to the programmer that the computer ignores.
In this assignment, we’ve provided you with signatures and purpose statements for the first few functions you need to define. Whenever signatures or purpose statements are not provided, you are required to write your own.
Reminder: Functions vs. Simple Expressions
In Part 1, your answers (e.g. question-1 and so on) were simplifiable expressions formed by calling other functions. They all simplified to images. In Part 2, your answers will be functions formed using lambda.
Examples!
| Expression | Function |
| 2 + 2 | f(x)=2+2 |
| x+1 | g(x)=x+1 |
| g(3) | h(x)=g(x) |
(circle 50 "solid" a-color) | (lambda (a-color) (circle 50 "solid" a-color)) |
(iterated-overlay (lambda (n) (square n "solid" "blue")) 5) |
(lambda (number-of-iterations)
  (iterated-overlay
   (lambda (n)
     (square n "solid" "blue"))
   number-of-iterations))
|
One way to summarize the difference is that expressions can be simplified to a concrete value of some kind, whereas functions have missing information (the arguments) which need to be filled in before we can simplify. When a function is called with that information, we can plug in the missing information and simplify.
Question 6: Paint Palettes
Write a function called palette that takes three arguments:
- A start color
- An end color
- A number of squares to generate.
palette should return a single image, consisting of a row of 75x75 squares. The number of squares to generate is given by num-squares, the third function argument.
The leftmost square should have color color-1, and the rightmost square should have color color-2. The squares in between should evenly interpolate between the two colors. Again, remember that iteration starts at 0 and ends at n − 1.
Here’s a starter for your function definition:
;; palette: color color number -> image
;; returns a single image, consisting of a row of 75x75 squares
;; the number of squares to generate is given by num-squares
(define palette
  (lambda (color-1 color-2 num-squares)
     ...))
Calling (palette (color 0 0 0) (color 255 255 255) 2) should produce a row consisting of two squares, one completely black and one completely white. If you have difficulty solving this problem, look back at all the functions you have used before. You can use as many of them as you want to solve this problem.
Question 7: Palette Grids
Using the palette function, you wrote in Question 6, write a function called palette-grid which takes four arguments:
- A start color
- An end color
- A row count
- A column count
palette-grid should return an image, a grid with num-rows rows and num-cols columns. Each grid cell should be a 75x75 square.
- Each row should interpolate evenly between the leftmost and rightmost color, like before.
- Each column should interpolate between the topmost color and white. However, the last column should not be completely white – this is different from what we’ve previously done. Specifically, if there are
mrows, then the last row should stop1 / mshort of being completely white.
You must use the palette function you wrote in Question 6.
Here’s another starter for you:
;; palette-grid : color color number number -> image
;; create a grid of interpolated colors
(define palette-grid
  (lambda (color-1 color-2 num-rows num-cols)
    ...))
Question 8: Bullseye Revisited
Recall that in Question 1, you wrote two equivalent expressions to generate a bullseye consisting of 5 rings with an outer radius of 50. Wouldn’t it be great if we could generalize this template to create bullseyes with any radius size and number of rings? Of course it would be! Rhetorical questions are so great. Well, the great news is that’s exactly what you’re going to do next!
Write a function called bullseye/simple which takes three arguments:
- A number of rings
- A radius
- A color
bullseye/simple should return an image of a bullseye with the specified number of rings. The outermost circle should have the specified radius. The lines of the bullseye should be the given color.
In contrast to previous functions, you must:
- Write your own signature, purpose statement, and definition for
bullseye/simple(see Questions 6 & 7 in the starter code for signature and purpose examples), and - Convert the two images provided in the
.rktfile into test cases; that is make your own calls tocheck-expectthat compare the value for a call forbullseye/simpleto the image provided.
We’ve provided one complete test case to start you off. Specifically, calling
(bullseye/simple 5 50 "purple")
should produce a bullseye identical to your answer for both parts of Question 1. Compare your code for Questions 1(a), 1(b), and 8, and notice the increasing generalization.
Question 9: Colorful Bullseye
Write a function called bullseye/color which takes four arguments:
- A number of rings
- A radius
- An inner color
- An outer color
bullseye/color should return an image of a bullseye with the specified number of rings. The outermost circle should have the specified radius. The innermost ring should have a color given by the third argument, and the outermost ring should have a color given by the fourth argument. The intermediate rings should interpolate evenly between the two colors. While you can’t reuse the bullseye/simple function here, you should use its implementation for inspiration.
Again, you must write your own function signature, purpose (see Questions 6 & 7 in the starter code for signature and purpose examples), and definition. You must also convert the two provided images into test cases.
Double Checking Your Work
Just because your program passes the various included tests (i.e. check-expects) that does NOT mean you will get a 100. In many of these problems, particularly the last few, we’ve asked you to write some tests yourself by giving you specific recommendations. As we get later in the quarter, we will start including fewer and asking you to write your own.
Before turning your assignment in, run the file one last time to make sure that it runs properly and doesn’t generate any exceptions, and all the provided tests pass. Keep in mind that we will be generating DIFFERENT images using your functions to see if they work the way the assignment specifies. You will only submit your RKT file, not the iterated-images.rkt file – in this class you will NEVER submit anything than your work to Canvas.
Pro-Tip 0
Do not MOVE an already open file. If you open a file in DrRacket (or any app) and THEN move the file in your operating system, the app doesn't know the file was moved. It will assume you want to save it in the older folder.Pro-Tip 1
Do not submit a file that you currently have open. Instead, finish your work then close DrRacket. That way, there's no possible way to submit an older file.Pro-Tip 2
Do not have multiple versions of the same file. It just makes it harder for you to keep track of what's what.Pro-Tip 3
Worried you didn't submit the right file? It takes seconds to check! Once you've successfully submitted on Cavnas, just download the file you just submitted by clicking on the link Canvas provides. Then open that file in DrRacket. Is it the right one? If so, you're good to go! There are more specific answers in the submissions details section below. If you want to RUN the file inside your downloads folder, keep in mind you would need to copy theiterated-images.rkt file into your Downloads folder as well.