Note: For groups that may have a significant amount of programming experience, your PM may suggest trying out the Advanced Tutorial 2
Submitting
Regardless of how you choose to complete the assignment, you MUST submit the file you worked on to Canvas.
If you’re submitting remotely, your submitted file will be graded for completeness and correctness via an autograder. Make sure your functions are named my-row, my-grid, my-bullseye, my-pyramid, my-bullseye/color and that all of the built-in check-expects pass.
If you’re submitting in-class, make sure to check-in and check-out using PollEverywhere with your location verified.
Getting Started
In this tutorial, you will be experimenting with creating images using the iterated-images library. To set up this tutorial, download the tutorial_2.zip. Ensure that iterated-images.rkt is in the same tutorial_2 folder as your tutorial_2.rkt file. Throughout, you will practice defining functions that depend on the functions from this library in order to create more complicated images than in Tutorial 0.
How to use ZIP Files
These files are provided in the ZIP file. You have to extract that zip file before editing. On a Mac double click on the ZIP file to expand. On Windows and ChromeOS, for some reason they allow you to open these files in what's called READ-ONLY mode (in the bottom right hand corner of DrRacket will be a yellow box that says READ ONLY). Don't do that! Instead, first extract all the files into your `cs111` folder and THEN start working.Error loading iterated-images.rkt
First, check to see that
iterated-images.rkt and your tutorial_2.rkt file are in the same folder on your computer. Second, make sure that the file you have open is actually the one you intended to open (close DrRacket then re-open your tutorial file.) Third, if you're on a Mac, you may have gotten a popup asking for permission to access a folder on your computer. If you said no...then DrRacket can't read your file. You can fix it by going to System Settings (or System Preferences), selecting the Privacy & Security tab, looking for the FILES AND FOLDERS option, and checking all of the options under DrRacket. Testing Code
Over the past couple of weeks, odds are you’ve been manually checking your programs using the REPL (i.e. run your function and manually compare the output to what you expected it to be by eye). However, this very quickly becomes a) annoying and b) quite difficult to do with images (can you tell the difference between a circle with radius 50 and a circle with radius 51?). So instead of doing things manually, we can augment our program with check-expects to test our program..well…programmatically!
check-expect is a function that tests to see if the output of its first argument equals the output of the second argument. These are usually typed in the Definitions Window so that whenever you run your program, it also runs the tests you’ve written.
Note: in this class, we’ll generally refer to these as
check-expects, but elsewhere in the wide world of computer science these might be referred to as “tests” or “unit tests.”
Since check-expect is a just a function with two inputs, we use the usual notation to call the function:
(check-expect expression
              expected-expression)
For example, this check-expect would pass:
(check-expect (+ 1 1)
                   2)
Once the check-expect runs, the REPL pane would return “The test passed!” Otherwise, the check-expect will return a report of which tests failed, displaying both the actual and expected outputs. For instance, try the following and see what you get:
(check-expect (+1 1)
                  11)
Note:
check-expectis a function that returns a boolean object. Booleans can have one of two values:#trueor#false.
Throughout this assignment, we’ll ask you to both run some pre-made check-expects as well as design your own to check your functions as you write them.
Part 1. my-row
Having already written some functions to produce images in the last tutorial, we are now going to write some iterations that will make our code more efficient at making complicated images. Let’s start with a simple function that will display multiple copies of an image next to each other, called my-row.
You are going to try and create a row of circles of a fixed size using iterated-beside, which is a function that takes as input a function and a count, and then displays an image defined by the inputted function count times (e.g. if you passed in a function call to circle and a 5 it would place 5 identical circles next to each other).
(define my-row
  (λ (image count)
    (iterated-beside (λ (image-number)
                        ...)
                     count)))
When you think you’ve got it, make sure to uncomment the check-expect for the my-row function (i.e. delete the #| and |# that currently surround the check-expect function call) and run your program to see if it matches the expected output.
Note that just because it works for those blue circles doesn’t mean it works for all other cases. Make sure to try your my-row function with some different inputs that aren’t blue circles to make sure it work the way you expect it to.
Part 2. my-grid
Now that you’ve got a working my-row function, let’s use it to make an even more complicated image: a complete grid of whatever image someone inputs to our function. For example, say I wanted to make a grid (5 wide and 5 high) of outlined green circles:
Use your my-row function as well as the iterated-above function to generate a square-grid of any inputted image. Call the function my-grid.
What is iterated-above?
It's literally a version of the built-inabove function that can be iterated. If you think of the overlay function, it does the following in English: "overlay shape 1 on top of shape 2 on on top of shape 3 on top of shape 4, etc..." The same is true of `above`: "place shape 1 above shape 2, which is above shape 3, which is above shape 4, etc..." Since you're creating identical rows this isn't so important at the moment, but it will be important later. Similar to your my-row function since the size of the shapes and rows aren’t changing, the my-grid function shouldn’t use the count variable to change anything about the shape or the row length. This function will take in an image and a number (n) and output a grid of images of size n * n.
Hint!
This might seem easy on its face...but it's very easy to get bogged down in parentheses. If you get stuck, try using your code frommy-row as a sort of "iterator template." In my-row you were just drawing a simple shape using whatever image was inputted. You're doing the same thing here, except instead of just drawing the inputted image, you're drawing a my-row of images! Just because your my-grid function works on the green circles DOES NOT mean it is correctly written (even it passes the check-expect). Try making a grid of blue circles using your my-grid function before moving on.
By using the my-row function inside my-grid, you’re practicing the key concept of abstraction. Once you’ve made a function to create a row of images, you no longer need to remember all those details–you just call the function! Once you’ve created my-grid, you don’t need to worry about ever writing it again–you just call the function! In a way, you’re creating larger and larger Lego bricks you can later combine into even more complex programs.
Part 3. my-bullsye
Remember that all iterators have a built-in counter variable that start at 0 and end at n-1. That is, they will run count times, but at their first iteration, their counter will be 0, then 1, then 2, and so on. They will then stop once the n - 1 iteration has finished its business.
For your next image, you are going to try and recreate a bullseye made out of purple-outlined circles with radii increasing by 25 each time. This function, called my-bullseye, will take one input, the number of circles to draw, and will involve iterated-overlay. The output should look something like this.
Notice that there is a tiny little speck in the middle of the bullseye example. What could that be?
Answer...
Remember the iteration counter starts at 0 (just like our exercises and tutorials started out at 0). In this bullseye and all the circles in the bullseye have a radius of their circle-number multiplied by a constant - in this case, 25 - then this must mean that the little speck in the middle of the circle is another circle, but with a radius of 0.Part 4. my-pyramid
Next, you are going to try to create a pyramid with a function called my-pyramid to create some awesome pyramids that would put Giza to shame.
You are going to want to use a structure something similar to your my-grid function for this, but this time, change the length of the rows on each iteration (just like you changed the size of each circle in my-bullseye).
Remember...
Remember thatiterated-above places "shape 1 on above shape 2, which is above shape 3, which is above shape 4, etc..." What this means is that if you think about building your pyramid from bottom-to-top...you might actually get a flipped pyramid. If this happens to you, try to think about building it from top-to-bottom. This function should take as inputs an image and a number (n) and then output an image of a pyramid with height n and base n made out of the input image. This will allow you to build a pyramid with any image you want and any size with literally just a few lines of a program. Abstraction is SO cool.
RGB(A) Colors
Like we explored last week, colors can also be represented in a format called RGB. The exact details of how RGB works are beyond the scope of this course, but you can think of a color as a list of three values between 0 and 255, each member of which corresponds to the amount of red, green, and blue light it contains.
Some Examples!
- "blue" is (0 0 255). Notice that this color has zero red light, zero green light, and full blue light.
- "black" is (0 0 0). This color has zero red, green, and blue light.
- "white" is (255 255 255). This color has the maximum amount of light of red, green, and blue light.
In Racket, we denote RGB colors with the color function which has a type signature of the below
;; color: number number number -> color
(color red-light  green-light  blue-light)
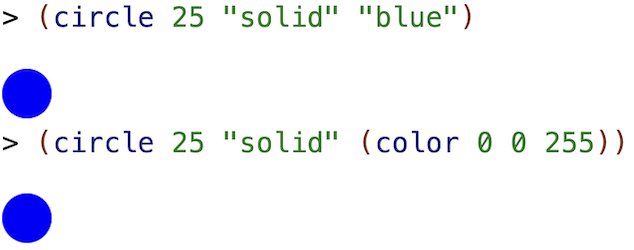
where each of red-light, etc. is a number between 0 and 255. So we can replace "blue" with (color 0 0 255) as demonstrated by the following REPL session:

Returning to the flower you wrote in the previous question, change the color "blue" in the ellipse definition to (color 0 0 255). The test should still pass.
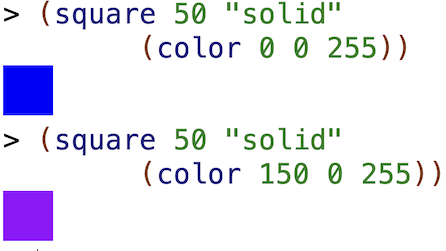
Since we can represent colors numerically, we can also use simple math to change colors. For example, increasing a color’s red-light value by 150 will make it 150 units more red:

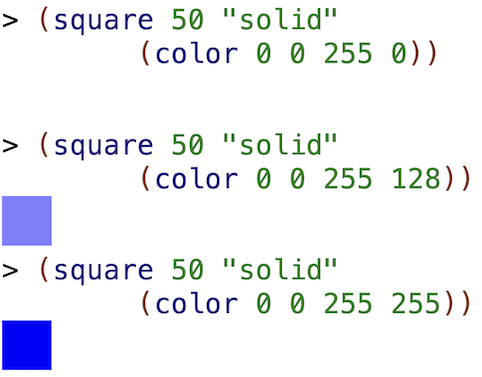
We can also control the opacity of a color by adding a fourth number, known as the alpha value. The alpha value is a number between 0 (completely transparent) and 255 (completely opaque). Once you add an alpha value to an RGB color, you’re using the RGBA format (the A stands for “alpha”).

Note that the Racket color function takes either three or four numbers. If you only supply three, Racket assumes you want a fully opaque color, so the alpha value will default to 255.
interpolate-colors
Now that we have iterators that allow us to generate more complex images, we probably want a way of generating colors. Manually calculating RGB shade differences can be, well…annoying. Since the disciplinary purpose of computer science is to help programmers be productive once to enable future laziness, we now introduce a new function called interpolate-colors, which provides a much easier way to blend two colors:
;; interpolate-colors: color color number -> color
(interpolate-colors color-1 color-2 fraction)
where the fraction is a number between 0 and 1, which denotes how much to blend the two colors. Using a fraction of 0 just returns color-1, and a fraction of 1 just returns color-2.
Important Note: you can find the list of built-in colors in the documentation. To blend other colors (or colors with different transparency), use the
colorormake-colorfunctions described above and in the lecture slides.
Just as iterated-overlay abstracts away the tedium of calling overlay with ten basically identical circles, interpolate-colors abstracts away the math of computing the RGB difference between two colors.
Part 5. Color Fun
Write a new version of your bullseye function called my-bullseye/color that’s similar to my-bullseye but with a few major differences:
- The function should have two additional inputs called
start-color(2nd input) andend-color(3rd input). - The circles should be
"solid". - The inner-most circle should be of size 25 instead of 0 (with the same increasing radius as before)
- The inner-most circle should be the
start-color - The succeeding circles should be evenly interpolated (i.e. 0%, 10%, etc…) between
start-colorandend-color - The outer-most circle should be the
end-color
This one is tricky. Some hints are in order! Pretend we were making a 5 circle bullseye.
Hint 1
Remember, the iterator counter starts at 0 and goes to5 - 1 -> 4. Hint 2
The inner-most circle will be assigned the color(interpolate-colors start-color end-color 0) Hint 3
The outer-most circle will be assigned the color(interpolate-colors start-color end-color 1) Hint 4
The 2nd inner-most circle will be assigned the color(interpolate-colors start-color end-color (/ 1 4)). At this point, the iterator counter would have a value of 1 Hint 5
The 3rd inner-most circle will be assigned the color(interpolate-colors start-color end-color (/ 2 4)). At this point, the iterator counter would have a value of 2.