Getting Started
In this assignment you’ll play with simple functions for making images that we’ll use later on in the course. Make sure to work with the other people in your group. If you find yourself needing help, post on Piazza!
DrRacket’s main interface consists of two main panes, which default to being in Vertical Layout (on one top of the other). The top portion is the Definitions Window where you write your programs and execute them using the Run button at the top of the screen. The bottom portion is the Interaction Window where the results of running your program are displayed. You can also use the Interaction Window to run individual expressions in this window by typing them here and pressing the Enter key. Think of it like a playground where you can test small parts (usually one line or expression) of your program instead of the whole thing.
You can also set DrRacket to be in Horizontal Layout where the Program Window and Interaction Windows are placed in a horizontal orientation. To switch orientations, click on the View menu and select View Horizontal Layout (you can switch back the same way). I’ll usually use Horizontal Mode in class, but sometimes I waffle between the two. Do whatever works for you!
Go to the Definitions Window and add the following two commands to the beginning:
#lang htdp/isl+
(require 2htdp/image)
First we tell DrRacket to load in ISL then we tell it to use a pre-existing software package, specifically the graphics library (which is documented here). Now hit the Run button. That will ask Racket to load the graphics library so you can use it both in the Program and Interaction windows. Important: Racket will only load this library if you click Run. If you don’t hit Run, then Racket doesn’t “checkout the book from the library,” so to speak.
Review
In programming, you do most of your work by calling (or colloquially “running”) functions. Just like in a math class, functions in computer science are basically machines that take in some input(s) and produce some output. In slightly different terms, functions are small programs written by someone else (and later by you) that take some arguments (inputs) and produce some output.
In order to use a function, we use a function call. In other words, we have to give the function its expected inputs and it will in turn give us its output. Racket uses a uniform notation for function calls:
(function inputs ...)
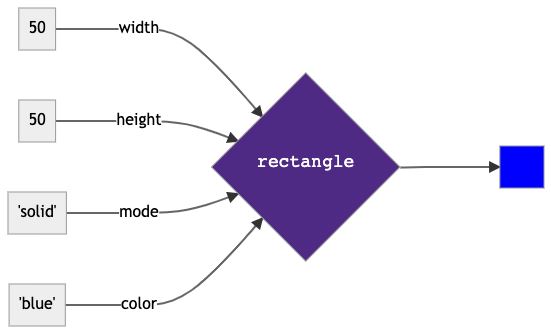
The name of the function you want to run comes first, followed by its arguments, separated by spaces, and the whole function call is wrapped up in a set of parentheses. Different functions require different numbers of and kinds of arguments. For example, the rectangle function requires two numbers (the width and height) followed by two strings (the drawing mode – either "solid" or "outline", and the name of the color to use). So we can make a 50x50 blue rectangle by saying:
(rectangle 50 50 "solid" "blue")
Try running that program now in the Interaction Window (sometimes called the REPL which we’ll talk about more later).
We call the rectangle function, passing it the inputs 50, 50, "solid", and "blue". Its output is another data object: the image of a blue square. Here’s what that whole process looks like in a data flow diagram.
Try changing the arguments to different values and rerunning the expression. Change the width and height, the color, etc.
All the functions in Racket are documented in the official Racket Documentation. There are lots of ways to lookup documentation for functions in ISL+.
- Look up the documentation on the
rectanglefunction. - See how it explains each of the inputs.
- The funny notation, like
(and/c real? (not/c negative?)), is short-hand for “a possibly fractional number that isn’t negative.” - You can click on
mode?to see which other drawing modes are allowed.
- The funny notation, like
- Now look up the documentation for the
ellipsefunction. What’s similar? What’s different?
Note: In this class, it’s generally a bad idea to copy and paste code from any source, including this document. For one, if you’re copy and pasting, you don’t get the sort of kinesthetic experience of programming. Secondly, many times when you copy and paste from documents and web pages, you accidentally copy and paste so-called “special” characters that look like a character you know, but are slightly different for example:
-and–look VERY similar…but are totally different characters. If you just copy and paste, you might end up with a mix of – and - which will cause lots of confusion down the road. So for all of the function calls we show below…please type them yourself! And thirdly, copy-and-pasting from sources not provided by the class may be a violation of our academic honesty policy.
Part 1. Simple Shapes
Let’s make a series of simple images. Use the relevant Racket functions to create the image you see (the lecture slides might be a useful resource here; as would the official Racket documentation):
First, let’s make a 100 x 100 solid green square. 
Save this shape in a variable named a-green-square.
Next, a blue circle with a diameter of 100. 
Save this shape in a variable named a-blue-circle.
Part 2. Compound Shapes
Now let’s make compound images from simpler images. For example, what if you wanted to make a shape like the below:

We can do this by first making two shapes and then joining them using a function called overlay. The overlay function takes images as arguments and outputs a new image that contains its inputted images stacked on one another (make sure to look it up in the reference materials!). Notice that this means we’re composing or chaining the calls to our shape functions with the call to overlay.
The outputs of the two shape functions are passed as inputs to overlay. The data flow we want looks like the below: two shape function calls that output each shape, followed by an overlay call that outputs the final image. This one is if you wanted to overlay two concentric (i.e. they share the same center point) circles.

How do we chain calls in our code? By moving the function call into the place where we want it to be used as an input. The three calls we want, written as text, would look like this:
-
(overlay circle1 circle2), wherecircle1andcircle2are the two circles we want to join…(circle 50 "solid" "red")(circle 100 "solid" "blue")
That means we just paste the second two function calls into the first one, replacing our place holders circle1 and circle2:
(overlay (circle 50 "solid" "red")
         (circle 100 "solid" "blue"))
The problem is this is hard to read because you have to keep track of the parentheses to know what things are inputs to what. To make this more easily to see, we break the function call up into two lines and indent the second line so that the two inputs to overlay line up:
(overlay (circle 50
                 "solid"
                 "red")
         (circle 100
                 "solid"
                 "blue"))
Once you understand this indentation convention, you can see visually that this is two circle calls feeding their outputs to overlay, without having to figure out the parentheses. Some programmers break it up further:
(overlay (circle 50
"solid"
"red")
(circle 100
"solid"
"blue"))
But this isn’t strictly necessary. The rules you want to follow are:
- Put the first argument on the same line as the function
- Put subsequent arguments on different lines if those arguments are calls themselves
Realize though that this is to make your code more human-readable, and will have no effect on how it gets run by Racket. That doesn’t make it any less important (in fact, I’d argue it makes it MORE important if you ever want to share your code).
Alright, now that you’ve seen an example of using overlay, see if you can adapt it to make a compound image of our blue circle from earlier on top of our green square from earlier like the below:

Save this shape in a variable named a-compound-image.
Of course overlay is just one function that makes compound images. Make sure to check out the other functions that do similar things like above (documentation link) and beside(documentation link).
Part 3. Concentric Diamonds
Reproduce the shape below. It’s 4 diamonds:
- black - size 20
- green - size 40
- blue - size 60
- red - size 80

Before jumping in, try to break the problem down into smaller sub problems:
- Find a function in the
2htdp/imagelibrary that produces diamond shapes (hint: diamonds are also a special form of rhombus where their “angle” is 90 degrees) - Create a really small diamond.
- Figure out how to make 3 slightly larger diamonds of different colors.
- Finally, take all four of the diamonds and feed them as inputs to a function that allows you to combine images.
This approach is often called sub-goaling and is a particularly important programming practice. Don’t try and approach a complex problem all at once. Instead, identify smaller parts you already know how to do and work towards combining them into the ultimate goal.
Save this shape in a variable named a-concentric-diamond.
Submitting
Once you’re done, save your file to somewhere on your computer. I recommend making a “COMP_SCI 111” folder on your desktop. Though the file name doesn’t matter for grading…do something reasonable like: tutorial1.rkt.
Save your file and close DrRacket (this way you know for a fact that you’ve saved your latest work and that’s what’ll be submitted to Canvas). Upload the file to Canvas and submit. In a minute or two you’ll receive autograder feedback. If you don’t get a 100 look at the autograder report you receive to see which problem may have not passed the automated tests. You can look at the report by reviewing the attached file in your submission feedback on Canvas. It’ll be an HTML file that can be opened in any web browser. You can see examples of what that looks like here on Piazza!
Note that the Canvas submission page won’t automatically refresh with your feedback. If you have the Canvas app on your phone / tablet, you should receive a notification when your feedback is ready. Otherwise, go take a brief walk around the room and come back and refresh the page.